The ABCs of the IYTWs- Exercises for the Resilient Shoulder
The Rotator Cuff muscles
By Martha Theirl, PT, DPT
Are you working on your shoulder strength and resilience? I know I am. In college I separated my right shoulder during a lacrosse practice and I had difficulty with the shoulder feeling stable after that. I stopped benching for a number of years and would get pain from my neck down my shoulder when carrying my stick or running over 2 miles. I had difficulty putting weight over my head. I separated my shoulder three more times over the next 7 years. It always ached after games or running and I was frustrated.
While in Physical Therapy school, I was introduced to the I, Y, T- often the go to exercises for those in shoulder rehabilitation. I love these three and eventually learned a fourth, the W which I use often when programming for my patients.
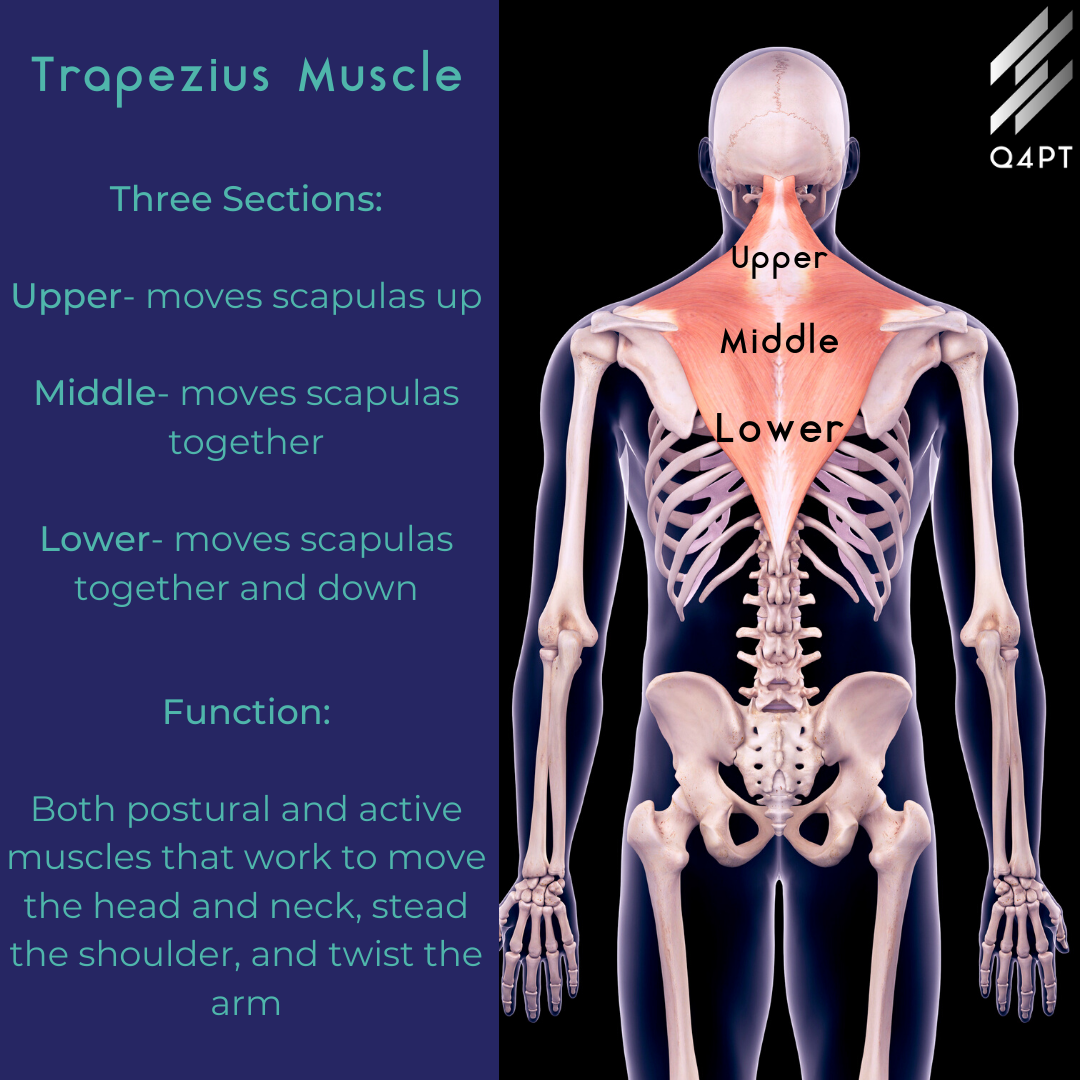
Anatomy and Function of the Trapezius muscle
First, some anatomy: These exercises focus on the back muscles, mainly the middle and lower part of the trapezius. They also hit all rotator cuff muscles which include the infraspinatus, subscapularis, teres minor, and supraspinatus muscles (see above image). These work together to stabilize the shoulder and move the arm.
Here are some tips to make sure you’re getting the most out of these exercises:
The Y
The Y focuses on the lower trapezius, latissimus, and a bit of the erector spinae muscles in the back.
Body Position: On your stomach. This allows the focus to be on the back and shoulders, and not on where your feet are or arching your back. Engage your core, squeeze your butt muscles, and press the legs together.
What to feel: You should feel this between the bottom part of your shoulder blades.
Pitfalls: bending the elbows, using the arm to lift instead of the shoulder blade (scapula)
The I
The I focuses on the back of the shoulder, and helping you move your shoulder blades up and down your back
Body Position: On your stomach as described above. Reach arms overhead with thumbs facing up and side of the palm on the ground. Using the scapulas, pick the arms off the ground without bending the elbows.
What to feel: Feel your scapulas traveling down your back
Pitfalls: arching the back, use upper traps too much, or lift chest off the floor.
The T
The T focuses on the middle trapezius and rhomboids (depending on if your arm is thumbs up or thumbs down position but it’s more of an emphasis than turning off/on).
Body Position: Yup, you guessed it, as described above! By the way, any of these can be done in a bent over standing position once you can control your range of motion and core from the floor. Keep arms straight and squeeze scapulas together to raise arms.
What to feel: Feel scapulas squeezing together.
Pitfalls: Lift the chest, bend the elbows, or only use the arms.
The W
The W is my favorite! It mimics an overhead pressing position and really allows you to focus on control and engagement of the shoulder and lats.
Body Position: Same as described above. Lift arms overhead with palms facing the ground. Pull elbows down and toward your sides maintaining the hand and elbow at the same height (ie do not let elbows drive toward the ceiling or wrists come towards the ground).
What to feel: Feel lats engage on the sides of the body and feel scapulas squeeze together and pull downwards on the back.
Pitfalls: letting elbows flare toward the ceiling, hands come down toward the ground.
How many should you do? Focus on quality, not quantity! Go slow and focus on what muscles you are using. Depending on my patient needs, these are programmed 2-5 days per week. Remember, these are just part of the equation!
Be resilient to the finish.
Do you have a shoulder injury that’s keeping you from doing the things you love? Let’s work together to get to the root cause of what’s going on and bring you from the sidelines into the game! Fill out our contact form or email martha@q4pt.com and we will be in touch shortly!
*Disclaimer: This content is provided for educational purposes and is not intended to be specific medical advice. Please consult a licensed professional to address your personal needs.


